
![]()
Lesson 1 – Setting up the dev environment
Lesson Overview
In this lesson, we will set up a virtual Linux machine in AWS EC2 that will be our development environment. On that machine, we will download a flask application from github and stage it for deployment to AWS lambda using zappa.

As a best practice, do not use the AWS account root user for any task where it’s not required. Instead, create a new IAM user for each person that requires administrator access. Then make those users administrators by placing the users into an “Administrators” group to which you attach the AdministratorAccess managed policy.
**WARNING:** For this lab, it is **highly advised** that you set the
- Default Region for the AWS CLI (and consequently the API) to **us-east-1** region. Because we will be deploying lambda & s3 storage buckets via API to the region you specify in the next steps. If you choose a region other than **us-east-1** it will take a couple of hours to propagate the dns redirect url for the s3 buckets which will allows us to http post files to the s3 bucket
Lesson 1
- Create an AWS IAM Admin User and Group
- Login to the AWS console as an administrative or the root user
- If you already have an administrative IAM user, simply create/download the API credentials.
- IAM > Users > Select User > Security Credentials > Access keys > Create Access Key > Download .csv file
- If you do not have an administrative user, create one using the steps below:
- IAM > Users > Add User
- Set – user name
- Check Box – Enable Programmatic access
- Check Box – Enable AWS Console access
- Select Box – Custom Password
- Set – User Password for Console access
- Uncheck Box – require password reset
- Push Button – Next: Permissions
- Push Button – Create Group
- Set – Group Name: ‘Admins’ (or similar name)
- Check Box – Policy name: AdministratorAccess
- Push Button – Create Group
- Check Box – ‘Admins’ group
- Push Button – Next: Review
- Push Button – Create User
- Push Button – Download .csv
- Push Button – Close
- Deploy AWS Linux AMI to EC2
- Login to the AWS console as an administrative user
- AWS Console > EC2 > Instances
- Select **N. Virginia** region in top right of AWS console (this is us-east-1)
- Push Button – Launch Instances
- Push Button – Amazon Linux AMI: Select
- Check Box – t2.micro
- Push Button – Review and Launch
- Push Button – Launch
- Select – Create a new key pair
- Set: Key Pair Name (i.e. “brians_keypair”)
- Download keypair.pem file to your PC
- Push Button – Launch Instance
- Copy public_ipv4 address to clipboard
- Configure ssh client to connect to AWS Instance
- WINDOWS: Connecting to Linux from Windows Using PuTTY
- Download and install putty ssh client and puttygen if you don’t already have it: Putty MSI 64 bit
- Use PuTTYgen.exe to convert the AWS .pem file to Putty .ppk format
- Start PuTTYgen (Start Menu > All Programs > PuTTY > PuTTYgen).
- Click Load button
- Select the option to display files of all types.
- puttygen2
- Select the .pem file that you downloaded when you launched your instance
- Choose **Save private key** to save in .ppk format that PuTTY can use. PuTTYgen displays a warning. Choose **Yes**.
- Use **PuTTY.exe** to ssh to ec2 server
- Start PuTTY (Start > All Programs > PuTTY > PuTTY).
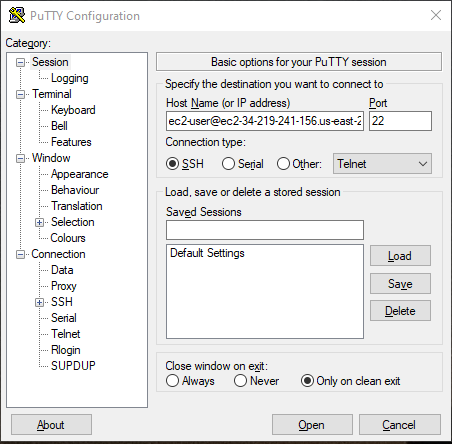
- Host Name – **ec2-user@**xx.xx.xx.xx where xx.xx.xx.xx is the public IP of your EC2 instance (port: 22)
- Saved Sessions: Give the session a name in ‘Saved Sessions’
- Navigate to: Connection > SSH > Auth & Choose the .ppk file created by puttygen above
- Navigate to: Session & click Save to save the session
- Click – Open to ssh into new EC2 virtual machine
- MAC/Linux: Connecting to Your Linux Instance Using Linux or Mac SSH
- open terminal application
- set permissions for key file `chmod 400 ~/Downloads/my-key-pair.pem` (substitute location and file name)
- connect to ec2 host. NOTE: user name is <b>ec2-user@</b>
- `ssh -i ~/Downloads/my-key-pair.pem ec2-user@xx.xx.xx.xx` (where xx.xx.xx.xx is the public IP of your EC2 instance)
- WINDOWS: Connecting to Linux from Windows Using PuTTY
- Configure the AWS CLI on the EC2 host
- use the access key id, secret access key from the downloaded csv and use region **us-east-1**
aws configure
- EXAMPLE:
$ aws configure
AWS Access Key ID [None]: AK1AIOSFODNN7EXAMPLE
AWS Secret Access Key [None]: w1alrXUtnFEMI/K7MDENG/bP1RfiCYEXAMPLEKEY
Default region name [None]: **us-east-1**
Default output format [None]: json
- use the access key id, secret access key from the downloaded csv and use region **us-east-1**
- Test AWS cli connectivity. This command should list the Public DNS Name for all of your EC2 instances
- aws ec2 describe-regions
- If your AWS client is configured incorrectly, you will get an error
- Configure virtualenv for the flask application
- virtualenv is a tool to create isolated Python environments. The basic problem being addressed is one of dependencies and versions, and indirectly permissions. Imagine you have an application that needs version 1 of LibFoo, but another application requires version
- This tool allows you to have an environment for each application
sudo yum install python-pip
pip install --user virtualenv
virtualenv ~/venv/flask
- Python3 option: if you would prefer to use python3 (not required), use the following to setup your python3 virtual env.
- Note that amazon linux 1 requires that we install “python36” and amazon linux 2 requires that we install “python3”. In the command below, we’ll try to install both to cover both scenarios. Depending on the amazon linux version you chose, one will succeed and one will fail, but python 3.6 should get installed regardless.
sudo yum install -y python36 python3
if [ -d ~/venv/flask ]; then rm -rf ~/venv/flask; fi
python3 -m venv ~/venv/flask
- Activate the virtualenv
- sourcing the “activate” binary sets the user’s environment up to use that specific virtual environment. Libraries can be installed in that virtual environment and are local to that environment
source ~/venv/flask/bin/activate
- When the virtual environment is activated, the shell prompt will be prefix’d with the virtual environment name
- EXAMPLE:
[ec2-user@ip-172-31-21-202 ~]$ source ~/venv/flask/bin/activate
(flask) [ec2-user@ip-172-31-21-202 ~] $ _
- sourcing the “activate” binary sets the user’s environment up to use that specific virtual environment. Libraries can be installed in that virtual environment and are local to that environment
- Download some Python libraries into the virtualenv (flask & zappa)
pip install --upgrade pip
pip install Flask
pip --no-cache-dir install zappa
- Download git tool
sudo yum install git -y
Lesson 1 Summary
In this lesson, we completed the following tasks:
- Created an admin user in AWS console and downloaded cli/api access keys
- Deployed a Linux VM into amazon EC2 and downloaded the ssh keys
- Configured a ssh client on our PC to connect to the Linux EC2 instance
- Configured the EC2 instance’s AWS CLI with our access credentials
- Created a python virtual environment on our EC2 instance
- Installed some required python libraries into our virtual environment
- Installed the git utility that we’ll use to download code next!
Now we have a VM all set up and ready to build a Flask application.
In Lesson 1 we’ll get started with a Hello World application
Recent Comments